

Integration best practices
This section provides information to help application developers and integrators develop solutions that fully take advantage of the power of document authentication.
Authentication and the Business Process
Section titled “Authentication and the Business Process”AssureID verifies the authenticity of a document by performing multiple tests using scanned images from one or more available light sources, such as visible, near-infrared, and ultraviolet. AssureID uses a wide range of authentication techniques for each supported document. In fact, most supported documents are authenticated using 20-50 or more unique security tests, depending on factors such as sides captured (front and back), light sources available (visible, near-infrared, and ultraviolet), and image resolution. The results of these individual tests are aggregated into a single overall authentication result for the document, which is an indicator (but not a guarantee) that the document might be fraudulent. Note that even authentic documents might still include failed individual authentication tests.
The AuthenticationResult property returned by the SDK has six distinct values. It is important to note these distinctions and report the results appropriately to the user:
-
Passed – The document was authenticated and no problems related to the authenticity of the document were encountered. Note that this is not a guarantee of authenticity, as some types of documents have very few or no security features.
-
Unknown – The document could not be successfully classified and therefore was not authenticated. This does not mean that the document is fraudulent, but it does mean that it must be inspected manually to verify its authenticity. Also note that this result can occur when a document is inserted incorrectly, overly skewed, or moving during capture.
-
Attention – The document was successfully authenticated and has no issues, but there is something of note that the user should be aware of. Most commonly, this result is returned when an expired document is encountered (the document is authentic but has expired).
-
Caution – During authentication, one or more issues were encountered that question the authenticity of a document, requiring the user to perform a manual inspection to validate the authenticity of the document. Note that this is not a guarantee of a fraudulent document, just that a problem was discovered that needs to be looked at.
Note: A Caution result is returned for individual authentication tests only when one or more issues are encountered that question the authenticity of a document. Caution is not a valid overall document authentication result.
-
Alert – During authentication, one or more issues were encountered that question the authenticity of a document, requiring the user to perform a manual inspection to validate the authenticity of the document. This differs from caution as it typically indicates a higher likelihood (but not a guarantee) that a document is fraudulent. Again, manual inspection is always necessary to determine if the document is indeed valid or fraudulent.
-
Skipped – As an overall document result, if AssureID is running in Data Capture mode, no authentication tests are performed, so AssureID returns an overall authentication result of Skipped. For individual authentication tests, Skipped indicates that AssureID did not run that test for the current document, either because it determined the test was not applicable, or that it was configured by the user to skip the test.
Automatic document authentication is a tool that can greatly assist users in validating the authenticity of a document. However, it is important to note that this does not prevent situations where the user must make a final determination on the authenticity of a document, and this needs to be reflected in the business process.
If a document is flagged as suspect, how will this exception be handled? Aborting the transaction is not a good approach, as it is possible that the document may be authentic. Customers who have successfully integrated document authentication into their business process have developed mechanisms to handle these exceptions within their process flow. Examples of this include:
- Training the user to review the detailed authentication results and perform a manual inspection to validate the authenticity of the document.
- Having a supervisor review the document authentication results and perform a manual override to continue the transaction if the document proves to be authentic.
- Sending the document bearer to secondary inspection for further investigation by a more trained individual.
If the user is responsible for manually inspecting the document, it is critical to make the details of the failed authentication results (alerts) available to assist with the manual inspection process, including:
- Authentication type
- Region of interest
- Detailed alert information
- Suggested corrective actions
Simple, intuitive user interfaces have shown to be better in communicating the results of the document authentication process. Instead of providing too much detail on the main screen, provide only the relevant details required by the application and/or user (authentication result, details on “failed” authentication tests, and required biographic or document fields), and optionally provide subordinate, more detailed screens for users to explore the reasons for the overall result.
If certain authentication tests or document types don’t perform as well as desired, they can be “tuned” using the Document Library Customization Wizard to modify which document types are enabled and which authentication tests are performed.
Data capture
Section titled “Data capture”While data can be very accurately extracted from 2D barcodes, contactless chips (e-Passports), and magnetic stripes, reading data from a document image using OCR (optical character recognition) is somewhat less reliable. Read errors are likely.
Note: If it is important to have accurate data in an application, implement a provision to allow users to correct the data.
When data is read from a document using multiple data sources, such as OCR, 2D barcode, magstripe, and contactless chip, the information is available to the application as fields. There is also a generic field that represents the most reliable data source for the field. For example, using the document bearer’s birth data as an example, there might be up to four fields associated with birth date:
| Type | Description |
|---|---|
| VI Birth Date | Birth date extracted from the document image using OCR |
| MS Birth Date | Birth date extracted from the magnetic stripe |
| 2D Birth Date | Birth date extracted from the 2D barcode (PDF417) |
| Birth Date | The software’s determination of the most reliable birth date data, using the above data as inputs. In general, an application should use this “generic” field unless the data from a specific data source is required (not typical). |
Working with document reader devices
Section titled “Working with document reader devices”When the document reader is capturing a document, the application should clearly indicate this and clearly indicate when the document can be removed from the reader by the user (using the DocumentMayBeRemoved event). Many authentication failures can be attributed to operator error in either presenting documents to the reader incorrectly or removing documents too soon before all image captures of the document have completed.
Examples of how you can accomplish this notification are:
- Clearly visible instructions (Insert Document, Capture Document, and Remove Document)
- Animated icons or progress bars to illustrate that the capture is in progress
It is beneficial to make an image of the entire captured document available to users so they can observe or detect authentication issues that might be related to document presentation problems, such as the document being inserted incorrectly or removed too soon.
Document readers that use ultraviolet (UV) tubes require time (several minutes) to fully warm up before they can capture images that can be authenticated correctly.
Scanning documents with a contactless chip
Section titled “Scanning documents with a contactless chip”When inserting a document with a contactless chip into the document reader, the reader must be able to read the MRZ of the document in order to open the contactless chip. If a failure occurs when reading the MRZ, then a MRZ correction required window will appear, requesting the user to enter the corrected MRZ code.
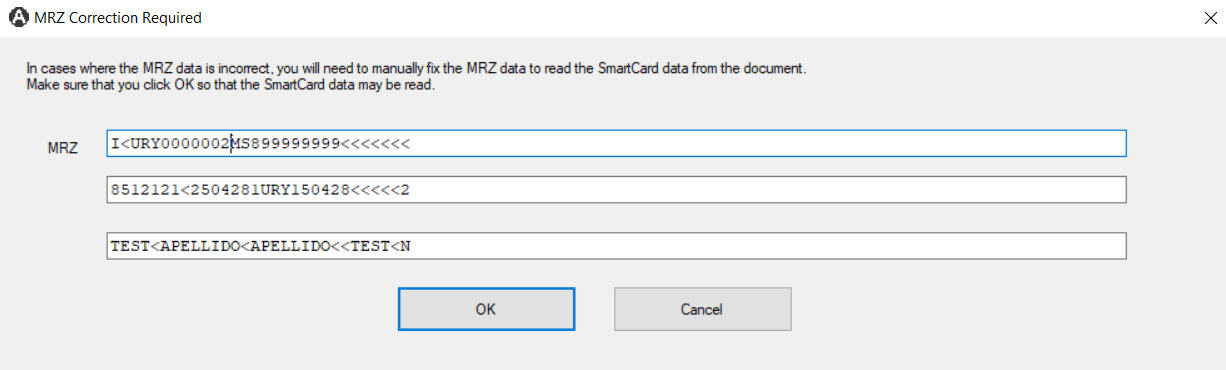
AssureID Sentinel will then use the corrected MRZ to open the contactless chip for reading and display the contactless information on the Fields tab.
Handling document images during document processing
Section titled “Handling document images during document processing”If you have registered for the DocumentImageAdded event, your application receives document images as soon as AssureID begins capturing them, which will be before AssureID has time to classify (recognize the type of) the document. As a result, the first (few) image(s) are returned in whatever orientation the user scanned the document. When AssureID can classify the document, it automatically orients the image to an upright position. You might want to re-render document images from within your DocumentClassified or DocumentComplete event handler. Get the latest DocumentImage from the document and render it.
If you want AssureID to automatically rotate portrait (or “vertical”) documents to their upright position, set the AssureIDSession.OrientationCorrection property to true (false is the default). If you have opted for orientation correction, AssureID notifies you if a document image was rotated by setting the AssureTec.AssureID.SDK.TransactionDocument. DocumentInfo.OrientationChanged property to true. All of the example programs show this feature and illustrate a suggested method for implementing it.
AssureID also can distinguish the front of a document from the back (the front being the side that shows the bearer’s photo). Again, this can be done only when AssureID is able to classify a document, which means that any document images retrieved before classification might require adjusting once the document has been classified. This feature is controlled by the AssureIDSession.PresentationCorrection property (and is enabled by default). The DocumentFirstSideClassified event occurs when the first side of the document is classified (or if the first side cannot be correctly classified and returns Unknown).
If a user scans the back of a document first, the first image returned to your DocumentImageAdded event handler will be the back. After AssureID captures the other side of the document (the front) and classifies the document, it reports the first image(s) as the back and the second image(s) as the front. AssureID will indicate this using the AssureTec.AssureID.SDK.TransactionDocument.DocumentInfo.PresentationChanged property. All the example programs show this feature and illustrate a suggested method for implementing it.
Note: To use the PresentationCorrection feature on simplex scanners (scanners capable of capturing only one side of a document at a time), you will also need to set AssureIDSession.DuplexMode to DuplexModeType.Duplex to instruct AssureID Sentinel to capture both sides of a document.
If you are using the PresentationCorrection feature, and AssureID Sentinel can recognize both sides of the scanned document, the DocumentClassification alert returns an AuthenticationResult of Passed. If AssureID Sentinel can classify the front of the document, but not the back, it returns a DocumentClassification alert with an AuthenticationResult of Attention. If AssureID Sentinel is unable to classify either side of the scanned document, it returns a DocumentClassification alert with and AuthenticationResult of Unknown.
If using the PresentationCorrection feature, and the user scanned a document back side first, AssureID Sentinel returns a DocumentPresentation alert.
Language support
Section titled “Language support”All API calls now support the Accept-Language header, which lets you display authentication details (responses) in a specified language. AssureID Sentinel supports the following languages:
| Arabic (ar) | French (fr) | Portuguese (pt) |
|---|---|---|
| Czech (cs) | German (de) | Russian (ru) |
| Dutch (nl) | Greek (el) | Spanish (es) |
| English (en) | Italian (it) | Turkish (tr) |
The following example shows the Accept-Language header for the languages English (en) and German (de).
Example
GET http://connect-service-host/AssureIDService/Document/3701e605-b28f-480b-8354-3f0b308646e1 HTTP/1.1Authorization: Basic XXXXXXXXXXXXXXXXXXXXXXXXXXXXXXXXXXXXXXXXAccept-Language: enAccept: application/jsonHost: connect-service-host
GET http://connect-service-host/AssureIDService/Document/3701e605-b28f-480b-8354-3f0b308646e1 HTTP/1.1Authorization: Basic XXXXXXXXXXXXXXXXXXXXXXXXXXXXXXXXXXXXXXXXAccept-Language: deAccept: application/jsonHost: connect-service-host
Character set support
Section titled “Character set support”AssureID Sentinel supports optical character recognition (OCR) of the following character sets:
| Arabic | Japanese |
|---|---|
| Cyrillic | Korean |
| Chinese | Thai |
| Hebrew | Vietnamese |
| Baltic | Turkish |