

Image requirements and recommendations
The minimum requirement for processing a document with AssureID Connect is posting the white (light source) front (side) image of the document. There are specific imaging requirements that must be met to ensure that a document is correctly and accurately processed. These include cropping, resolution, and compression. The minimum and maximum accepted image size is defined by AssureID Connect in terms of pixel dimensions. The minimum pixel width and height is 100 x 100 pixels. AssureID Connect will accept images independent of a specified resolution, or in the absence of accurate resolution information. While AssureID Connect still benefits from accurate image resolution reporting, it will assess the resolution during classification.
Image color depth requirements
Section titled “Image color depth requirements”The following table describes the image color depth requirements for each illumination source.
Note: All images should be 24-bit RGB, except Near-infrared images, which should be 8-bit grayscale.
| Illumination source | Color depth requirement |
|---|---|
| Visible (white) | 24-bit RGB color |
| Near-infrared | 8-bit grayscale |
| Ultraviolet-A | 24-bit RGB color |
Image naming conventions
Section titled “Image naming conventions”The following table describes the naming convention for each illumination source for images used with the i-Dentify Emulator.
| Illumination source | Naming convention |
|---|---|
| Visible (white) | White |
| Near-infrared | NearInfrared |
| Ultraviolet-A | UltravioletA |
| Ultraviolet-A Back | Back-UltravioletA |
| Visible Back | Back-White |
| Near-infrared Back | Back-NearInfrared |
Image file formats
Section titled “Image file formats”The following table describes the supported image file formats and their respective file extensions.
| Format | File extension |
|---|---|
| Windows Bitmap | bmp |
| PNG | png |
| TIFF | tiff |
| JPEG | jpeg |
| JPEG-XR | vnd.ms-photo |
| JPEG 2000 | jp2 |
| HEIC | heic |
Image resolution
Section titled “Image resolution”Although the minimum supported physical resolution is 300 DPI (dots per inch), higher resolutions can improve document classification and OCR accuracy. For document authentication, GBG IDology strongly recommends using a minimum resolution of 600 DPI. If the resolution is not specified, AssureID will determine the resolution during classification.
Note: If you call GET Classification, the resolution in the metrics is an estimation based on the expected size you provided. If you call GET Metrics after calling GET Classification, the resolution in the metrics is based on the resolution/size determined during classification.
The original images from an imaging device should not be resized or scaled to a smaller size, unless the resolution is very high (greater than 800 DPI). Images with a resolution greater than 800 DPI should be scaled down in size and resolution before compression to optimize processing performance. The aspect ratio of the image should not be changed, and the horizontal and vertical resolution of the image should ideally be within 1% of each other.
Note: The AssureID Connect photo printing and substrate printing tests require a high-quality image to be effective. Submitting a low-resolution document image may result in these tests being skipped.
Glare and sharpness metrics
Section titled “Glare and sharpness metrics”Glare metrics describe the amount of glare on the image and is a measure of light uniformity across the document. GBG IDology recommends a score of 50 or greater to be considered an image with no glare or an acceptable level of glare. Sharpness metrics describe the sharpness of the image and is a measure of edge contrast across the document. A score of 0 means that the image is very blurry (not sharp) and a score of 100 means that the image is very sharp. By default, GBG IDology recommends a sharpness grade of at least 50 or greater to be considered an image with an acceptable level of sharpness.
Image compression
Section titled “Image compression”Do not excessively compress an image. Overcompression may degrade data capture and authentication performance. Use the following recommended minimum compressed image file sizes that correspond to the applicable light source.
Note: The recommended image compression for an image using a visible (white) light source has been increased (from 250 KB minimum/300-600 KB recommended to 500 KB minimum/600-1200 KB recommended) in order to perform additional authentication tests.
| Light Source | Minimum | Recommended |
|---|---|---|
| Visible | 500 KB | 600-1200 KB |
| Near-Infrared | 200 KB | 250-500 KB |
| Ultraviolet | 125 KB | 150-300 KB |
| Coaxial | 125 KB | 150-300 KB |
Note: The AssureID Connect photo printing and substrate printing tests may be affected by compression, therefore you should avoid overcompressing an image. Submitting an overcompressed image may result in these tests being skipped.
Image cropping
Section titled “Image cropping”Use the following guidelines for image cropping.
- Use None if the images are already tightly cropped.
- Use Always if the images are uncropped.
GBG IDology recommends that you only use Automatic as a last resort. The only scenario where it may provide better results than None or Always is if you have an ID1-sized document where one side is cropped and the other side is not. Note that the Automatic setting will generally result in an unnecessarily high Unknown rate and will cause inconsistent behavior for non-ID1-sized documents. If possible, you will get better results if you run one transaction set to Always, and then if you get an Unknown result, retry with None.
The following table describes the settings for image cropping.
| Cropping mode | Description |
|---|---|
| Always | Cropping is always performed on posted images. Note: This will result in additional processing time if you submit images that are already cropped. |
| None | No cropping is performed on posted images. This mode should be used when the images are already tightly cropped to the document when posted. (DEFAULT) |
| Automatic | Automatically determines whether image cropping is required on each image and performs the cropping and calculates image resolution when necessary. Note: GBG IDology does not recommend using the Automatic setting. |
If the cropping mode is set to None and the expected image size is not specified as ID1 or ID3, then AssureID will determine the resolution. GBG IDology recommends setting the cropping mode to Always.
Examples
Section titled “Examples”The following are examples of uncropped, properly cropped, and poorly cropped ID3 size sample (passports) documents.
Uncropped images
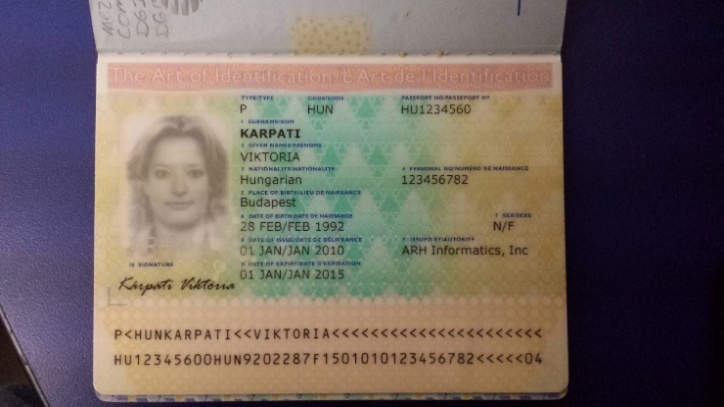
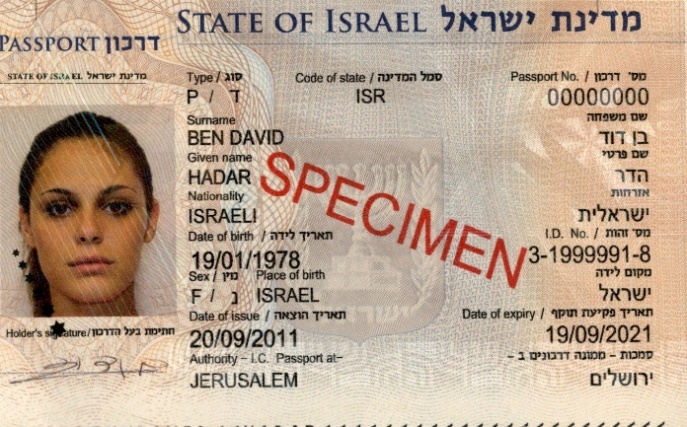
The following figure illustrates an overcropped image. Notice that the MRZ is cut off and the left side is too tightly cropped.
Properly cropped image
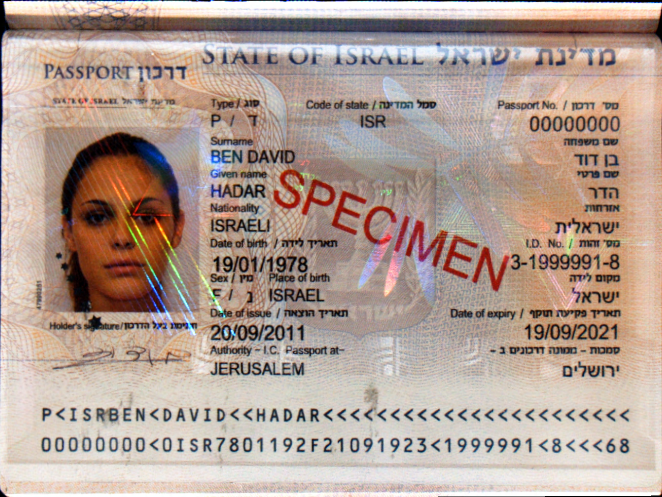
Cropping an image
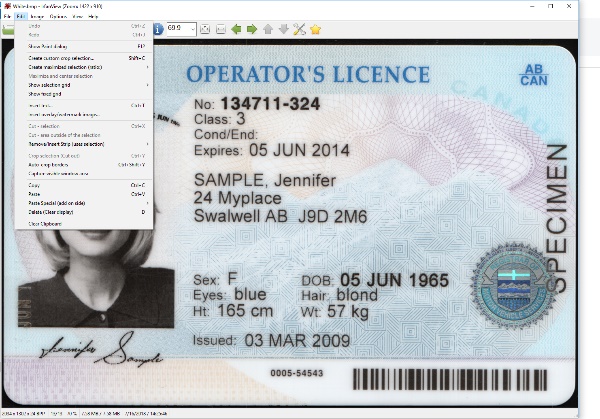
Section titled “Cropping an image”The following procedure describes how to crop an image, using an editor such as such as Irfanview.
Crop an image
-
Open the image:
-
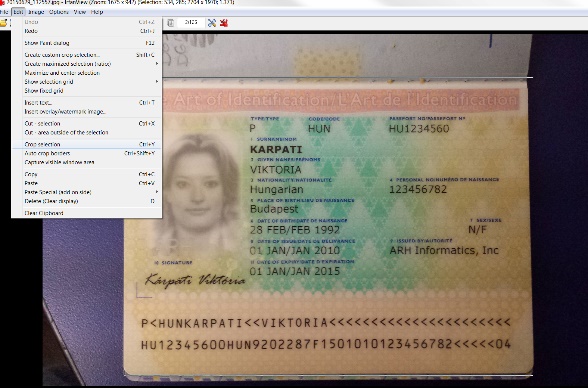
Select the area to be cropped.
Note: For passports only, capture the data page.
-
From the Select menu, click Image > Information:
-
Edit the image properties to set the correct resolution.
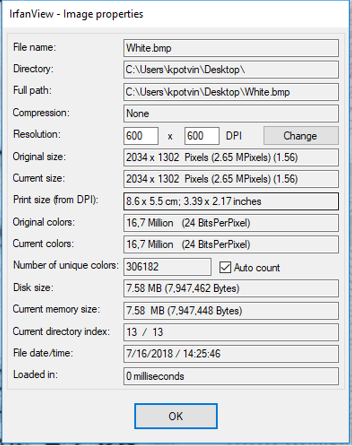
To determine the actual resolution, divide the number of pixels in the document by the dimensions (size) of the document type (ID1 or ID3):
ID1 3.37”W x 2.125”H
ID3 4.921”W x 3.456”H
Round up decimals to a whole number. For example, for the sample image:
2034 ÷ 3.37 = 603 dpi
1302 ÷ 2.125 = 612 dpi
Note: Many images are set with a default resolution of 72 DPI or 96 DPI. This must be changed to the actual resolution, based on the number of pixels that are in the saved cropped image.
- Select Change.
- Click OK to apply.
- Save the image using the proper image naming convention.